HTML: Image Maps
Image maps are one of the most interesting ways of using an image in your HTML web page. This article assumes that you have gone through all the previous articles regarding the use of images in your HTML web page. If not, it is highly suggested that you should go through them in order to understand better the use of images and different techniques to make it efficient and effective. In this article the creation and different uses of image maps in your web site is discussed.
So what is an image map?
Image map contains an image that has one or more clickable areas. These clickable areas on an image are called as hotspots. A hotspot is an area or a location on an image that causes the execution of a function when it is clicked by the user of the web site. In a web page, the most commonly function is for navigation. That is when a hotspot gets clicked; it is commonly used as a hyperlink to another web page or a different location in the same web page. So you can consider an image map as a special and more advance version of an image hyperlink. The hyperlink can be for any type of resources.
Creation of image maps
Creating an image map is very simple. Generally, creating an image map involves three steps. First of all determine the dimensions of the image that you are going to use to create an image map. The dimensions must be represented in terms of pixels. For example, an image having dimensions of 128×128 means it has 128 pixels in horizontal axis and 128 pixels in vertical axis too. Second step for creating an image map involves more manual efforts. But it is not mandatory to do so exactly in the way it is described here. The second step requires you to sketch the image on a paper and draw something on those areas or encircle the areas on the image that you want to turn into hotspots for image map. An important note: an image’s top left corner in always considered as (0,0). The Y axis is positive moving downward. The X axis is positive moving right. The reason for doing so is that it will make it easy to determine the dimensions of the hotspots that you are trying to create on the image. As mentioned earlier it is not mandatory to use this way. You can use any other way to determine the dimensions of the hotspots on the image. After doing this, last third step is that, now add this information to the image in web page.
The tag that is used to add the hotspots and image map information in a web page is the “map” tag. Following is an example of how to use it.
“<body>”
“<map name = “title”> ”
“<area alt = “write a text description” shape = “rect” cords = “0, 0, 64, 64” href = “the url of another web page” target=”_blank” />
“<area alt = “write a text description” shape = “rect” cords = “0, 64, 64, 128” href = “the url of another web page” target=”_blank” />”
“</body>”
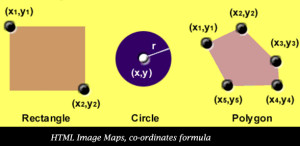
A hotspot can be shapes other than a rectangle. Valid shapes are point, rectangle, circle and polygon. Circle takes three values in the “coord” attribute: the centre point and radius. A polygon can take any number of points that join into a shape.
